Search This Blog

Monday, 9 June 2014

DIY birthday gift for girl

We had a birthday party to attend this past weekend for a pretty special four year old.  I was trying to think of what I could make her when Walter piped up that he wanted to make her something.  More specifically, he wanted to sew her something.
Well how can you say no to that, gentle readers?  You can't! Since Walter has become quite good at sewing pillowcases we thought that would make a nice gift. We rummaged through my fabric stash and found all the fabrics we would be needing which made this a $0 gift for us.  If you had to buy the fabric from the fabric store for this project you would be looking at a cost of $6-$10.

We used the pillowcase sewing method referenced in this blog post. I did add a quick "MEOW" applique    to the trim piece, the same way I appliqued in this blog post.

I also thought it would be cute if I made the birthday girl a sleep mask to go with her pillowcase. Obviously, as suggested above with the "MEOW" applique, I made the mask to look like a cat.  It was pretty darn cute and got quite the response when the gift was opened at the party.

Here is how I made a cat sleep mask:

  First I drew the basic shape of a sleep mask and also cat ears on a piece of paper

Sleep mask pattern
I cut four pieces of grey fleece for the ears
Grey fleece ears to be

Cutting the same ear pattern a bit smaller I made pink triangles for the inside of the ears and pinned them onto two of the four grey fleece triangles. Then with a quick zig zag stitch I attached them.
Soon-to-be cat ears
Next, with right sides together (pink sides in) pin and stitch your ear fronts to the ear backs.  Keep the seam allowance as narrow as you're able. Then turn right side out.
Cat ears
Next, I took an elastic and cut it to 13 1/2 inches. Okay, it wasn't really just elastic I had laying around.  I used a headband I had bought for my daughter and never used.  You can buy inexpensive elastic headbands from the dollar store if you don't have one on hand.
elastic for around the birthday girls head
I layered my grey fleece with a piece of felt and some satin on the bottom so it would feel smooth and wonderful against her face
Three layers in the sleep mask: fleece, felt and satin
Using my paper pattern I cut through all three layers of fabric.  Remember, satin frays quickly so you might want to heat seal the cut edges with a lit match before you continue on.  
I also took a tiny scrap of the pink fabric used for the ears and made a tiny nose.  I sewed that onto only the fleece layer.
Eye mask with nose
I pinned the ears between the layers along with the elastic then gave it a quick top stitch.
Looking pretty cat- ish

Using some black fabric paint I added whiskers and eyelashes.  
I think it's precious!

And here is the finished set together, a cumulative effort between Walter and I.
Taa-daa!


Thursday, 29 May 2014

DIY gift for Beaver Scout Leaders/Teacher/Grandma/Bridesmaids

Walters last Beaver Scout meeting is on the weekend with an overnight camp out for the kids. I wanted to give a small token of appreciation to his Scout Leader, Sunshine for all the time and energy and love she has put into this last season for the kids.

Although I made this as a Scout Leader gift I think it would work just as well as a teacher gift, as a gift for grandma or even a lovely bridesmaid gift.  You could even choose beads that Dad would like and make something similar for Fathers Day.

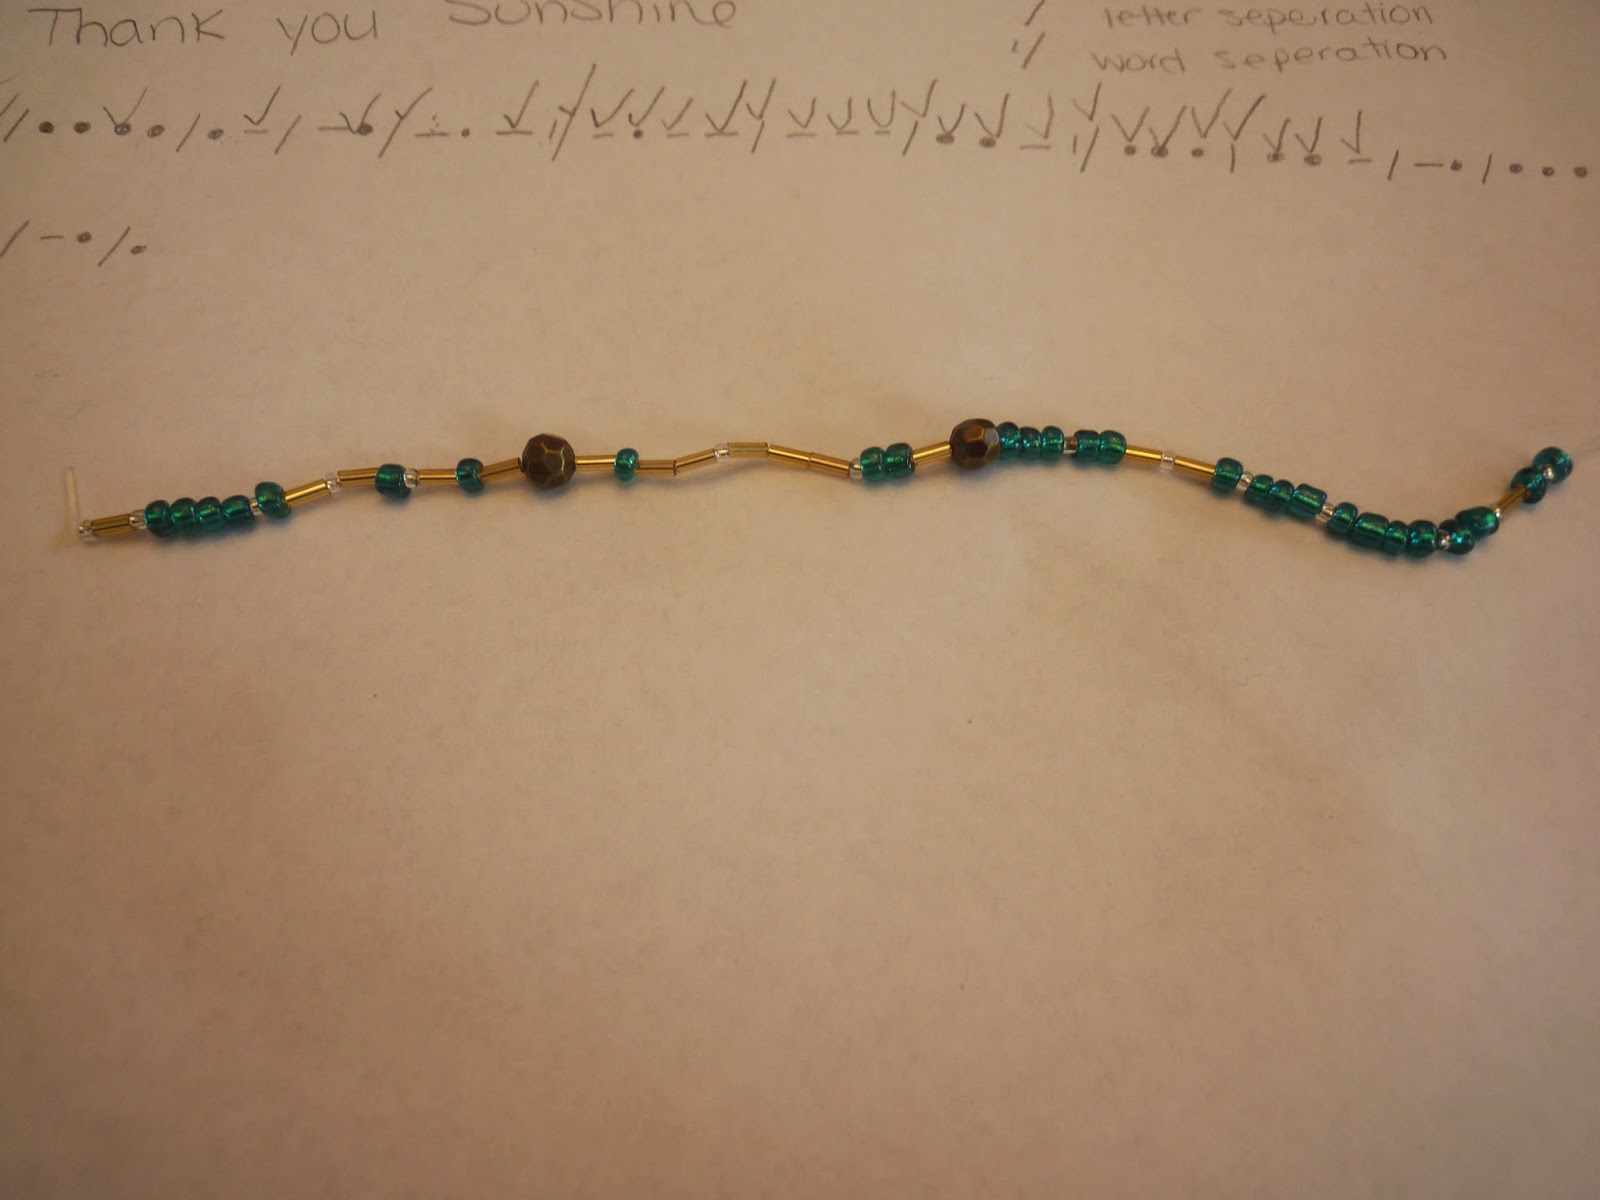
We made a Morse Code bracelet.

First we thought about what we wanted the bracelet to "say".  We decided on "Thank you Sunshine".  Remember though, the message could be absolutely anything you want it to be. The date of your wedding for your bridesmaids,  or a quote or phrase that is particularly relevant to the recipient.

Next we looked up a Morse Code chart online (insert awesome home school activity here about Morse Code, how it used to be used and how it is used now).  Then translated our message into code.
Our message in code

I bought two packages of beads.  One set from the dollar store and one from a big box department store.  Total cost of beads here was $4.50 (and I have beads left to make hundreds of bracelets or necklaces). The package of beads I bought at the dollar store also came with a small amount of stretchy cord.  You will need beads that represent a dot, a dash, a letter separation (I prefer tiny seed beads for this) and word separation.

First, tie a knot in one end of your cord.  Actually, you will likely need two or three knots.

I like to start with a small seed bead,  then start adding your beads according to your coded "pattern".

Walter beading away
In no time you have a completed coded phrase.
"Thank you Sunshine"

Tie both ends together securely and snip any excess cord.

Taa-daa!
Taa-daa!

 Add a small note to the gift explaining its significance and I am certain it will be treasured.


Monday, 26 May 2014

DIY Baptism gift under $15

We were able to attend a baptism for a very sweet baby girl this past weekend.
That Guy did the cake for the baptism reception and that was our "big" gift to her. But I still wanted to bring along a small something for her. (This particular little girl has a special spot in my heart).

I did not want to get her a bible.  Or a picture frame.  Or a Precious Moments figurine.  I was certain she would get those in spades, and how many baptism frames does one girl really need?

When I ran across this adorable poem on Pinterest, I knew it was something I could work with.   I loved making the comparison of washing the towel to become clean again with repentance. The poem was intended for the baptism of an older child and I needed it for a baby, so I knew I would have to alter it a bit.
Here is my altered version:


I bought Hilary a lovely white Lacoste towel from Winners (Marshalls for any american readers) for $12.99.  Yes, it's more than I usually spend, but like I said this little one has a special place in my heart and she's worth it.
I didn't want to just give her the towel though.  I wanted to make it special for her.  So, logically, I thought "Why not applique her name on the towel? That's a great idea!".  What I should have thought was "ummm, Rylan you have never appliqued. Anything. Ever".  Fortunately I didn't think that until it was much too late or this blog post may never have happened.

First I found a font I liked, then sized it to 225. I printed out her name in that font to use as a "pattern" for making my letters.  If you have artistic ability you might be able to skip this step.

Her name printed in a font I liked
 Then I pinned a scrap of light weigh fusible interfacing to the paper.  Because I did not want my letters on the towel to be backward I pinned the interfacing with the fusible (bumpy) side up. You could also use a product where both sides are fusible, like Heat 'N Bond, which might be nice to keep your letters from shifting as you sew.  But, alas, I had no Heat 'N Bond on hand, so interfacing it was.
Pinned with bumpy side up
 I traced the letters onto the interfacing.  Because the surface is bumpy it is hard to make all the straight edges very straight.  Do the best you can and give yourself grace for the rest. :)
The tracing isn't perfect... but it's not terrible either...
 Next, using an iron, fuse the interfacing to your fabric.  You only need a small scrap for this.
Remember your fusible side needs to go against the fabric, so your letters will be backward at this stage.
The letters should be backward here
 Cut out the letters.  I did this by hand with my giant sewing scissors, but smaller embroidery scissors might be much nicer to work with.
I pinned the letters to the towel (forward facing letters now because the interfacing is on the back side of the letters). I pinned them as straight as I could.  
Letters all pinned down

 Using a very small zig zag stitch I attached the letters to the towel. Below is a close up of my zig zag work.  Since this was my first time ever attempting something like this I learned a lot.  Part of what I learned was that if you have any hope of control or straight-ish lines you want to go slow. Not less fast; slow.
Turtle crawling through molasses slow. Internet Explorer slow. ;)
If you're working away and it never occurs to you that the child might graduate high school before you are done zig zag stitching you might be going too fast. Or you might have a lot more experience than I.
Remember that part where I said "give yourself
grace"? Yeah, that applies here too.

Finished, personalized towel.
Taa-daa!!!
 I made this for a baptism gift.  But you could personalize a beach towel, pair with some flip flops and a beach ball and it would be a great summer birthday gift as well.

Friday, 9 May 2014

DIY Mothers Day Gift from child, quick and easy

Audrey made her Nana a nail polish washer necklace for Mothers Day (find the how to here). That Guy is coming up with his own gift for his mom.  Yet that still left Walter without a gift to present to Nana on Sunday.

The kids Nana is a tricky lady to gift for. She doesn't like a lot of money spent on her. And although she has many interesting hobbies she moves from one to the other very frequently- making it hard to guess what she is most into now.  Except photography, that seems to be a hobby that has stood the test of time.  She loves photography and is quite good at it, be it landscape, wildlife or her two favorite models Walter and Audrey.

So Walter decided he should make Nana something for her camera and I thought it was a great idea.   We decided to DIY a camera strap for her.

This project cost around $3.  The nylon webbing and ribbon were on hand items.  The combination D ring/swivel clips were $2.49 each but I get 50% off with my discount card at the fabric store.

Walter is five years old and did this project with supervision, but by himself. So that means even the most beginners of sewers can take on a project like this with confidence.

First we gathered our materials (he chose the nylon webbing and the ribbon himself from my on hand stash)
1m of nylon webbing, 1m of ribbon and two
combination D rings/swivel clips
Then Walter pinned the ribbon down the center of the webbing.
All pinned down - with no injuries!

I heat sealed the webbing and the ribbon myself.  Once sealed neither should fray.

Then he ran a straight(ish) seam down the center of the ribbon to attach ribbon to webbing.
My sweet boy sewing :)

Next we slid on our D rings and pinned the webbing in place over itself.
Then we stitched that on the sewing machine as well.  Since this was a bit more difficult than one continuous line I gave him a bit more hands on guidance for this step. But once it was done, so were we!

Stitched down and done!


 Taa-daa, DIY camera strap for Nana less than $3 (and 15 minutes!)
Taa-daa!


Thursday, 8 May 2014

DIY Mothers Day gift from children- $1

DIY Mothers Day Gift - $1

This is my first Mothers Day without my mom.  I spoke with That Guy and explained that I will work with our kids on gifts for his mom, and with my daycare children on gifts for their moms, but that he would have to come up with and execute a gift idea for his mom himself. (Usually I take care of all of that on his behalf, but he understood).

Today I will blog about the gift the daycare children have made for their mothers.  ***SPOILER ALERT- If you are one of my daycare parents you may want to wait to read this post until after the weekend*** And tomorrow I will write a quick post about the gift Walter is making for his Nana.

I love doing crafts with my daycare kids. When we craft gifts for events (birthdays, mothers day/fathers day, Christmas ect) its important to me that they are gifts and not just crafts. As in, something they could actually use, over tissue paper flowers (for example) which are lovely and sentimental but don't get much real use.

So we made nail polish washer necklaces.

That Guy ran down to the local home improvement store for me and picked up some inexpensive metal washers. He got three sizes with the largest size being the most expensive at 34 cents each.  Since each necklace uses two or three washers we are looking at a total cost output here of roughly $1 each.

The first step is to wash the washers (hehe).  They often have a thin layer of grease or oil on them from the manufacturing process. Dry them well after.
Dry your washers well after washing
Next, outside (preferred) or in a well ventilated area pull out your collection of nail polish.  This project will use a noticeable portion of your bottle so you might not want to use really expensive nail polish for this project.  Fortunately for me, I only have pretty inexpensive stuff anyways.

Just paint your washers! The kids all chose their own colours.  Some kids really stuck with it and waited while coat after coat dried.  Others were gone after two coats, so I helped touch it up for them.  
If you have a light colour polish, be generous with the applicator brush- try almost "flooding" the washer with the colour.
One of the little ones painting away
Painting for Mommy
As mentioned you will have to let it dry.  Overnight is ideal but just a few hours of dry time will make it fine for handling.
Nice painting, kids!

I used a white french manicure polish marker to write the childrens names on the back of the washers, so none would get mixed up. You could also use the marker (or nail polish with a fine tipped brush) to add designs like stripes or dots to some of your washers.
Marked with their names
Stack your washers two or three high.
Stack 'em
Then the child chose the colour ribbon which would turn this from metal washers into an adorable necklace. Cut a length and don't forget to heat seal the edges of the ribbon with a lit match to keep the ribbon from fraying.    Fold your length of ribbon in half, and using the folded edge put it through the center of all three washers from the back to the front.
adding ribbon
Slide in the raw edges and pull
adding ribbon
Taa-daa!! Adorable necklace for Mom!!!
Taa-daa!

Look how pretty they all are!!


Monday, 28 April 2014

Comic book/Superhero bedroom decor

I had good intentions, gentle readers.  I did.
When we first bought this house - almost a year and a half ago now- Walters bedroom was the first one painted. My intention was to paint his bedroom, assemble all his new furniture and decorate his bedroom to make it a space he would really love.
The room got painted, and all the furniture assembled.  Then that's where we stopped. His bedroom got to that unfortunate place of "good enough for now".
Walter wants a comic book/ superhero bedroom. He has taken to drawing and painting pictures of super heroes and sticking them to his walls with tape.   Something needs to be done for this boy.   But a real bedroom makeover will cost a few hundred dollars.   Dollars that are otherwise accounted for in our family budget.
I could start small though.  Little things whose cost we could squeeze out of our weekly entertainment budget.  So that is what I have done.   I made him toss pillows for his bed that were inspired by comic books. I had almost everything I needed on hand, so a set of three will only cost about $9. (I only managed to get one done last night, but a set of three will be on his bed)


First, I found some free clip art printables with the iconic super hero sound effects. I printed them out in full page size.  These are what I used as a "pattern" for my letters.  If you have even an iota of artistic ability you can likely skip this step.  I, however, need a pattern very much.
Super hero sound effects
 I cut out my letters and pinned them to a piece of felt.   To be sure I wouldn't run out of felt, or have to switch dye lots in the middle of one of my words I bought felt off the bolt from the fabric store instead of using small felt sheets.  I bought more than enough red, blue and yellow felt to do all three pillows. The felt was on sale for 40% off (*grin*) and I bought a half meter of each colour. My total came to $9.66 after taxes.
I cut the letters from my felt with the paper pattern as a guide.
Paper pattern pinned to felt, ready for cutting
 Next I cut out the red felt.
POW background
 I pinned the letters to the backing...
pinned
Then I ran it through the sewing machine using yellow thread.
POW secured to red backing. 

 I have tons of smallish pieces of black felt on hand.  So I decided that would make as good a pillow as anything.  I measured out the size of black felt I wanted.  Roughly 10''x 12''.
The black background make the colours pop
 Using red thread I sewed the background to the black felt.  I did have to switch thread colours back to yellow to affix the parts of the "P" "W" and "!" where there is no red visible against the black.  I didn't want red threads running over the yellow felt.
With right sides together I sewed the pillow front to the pillow back leaving a space for tuning and stuffing.
Then I turned the pillow right side again.
Looking good 
 Using on hand pollyfill stuffing I filled the pillow. Then I stitched closed the opening.
Filling the pillow
 Looking back at the original clip art image, I wanted to add the black and white highlights seen there.  Using some fabric paint I copied what I saw.  I think the fabric paint really helps make it look like it came out of a comic book... you know...  comic book-y. ;)
Taa-daa!

Walter loves it and when the other two are finished they will be adorable on his bed.

Monday, 21 April 2014

Super Mario inspired birthday gift for boy

My son Walter attended a birthday party this past weekend for one of his friends turning six. 
I had no idea what this particular six year old boy might like, so I asked his mom.  Among other things listed, she said he liked Super Mario. 
 Perhaps because That Guy has been offering cooking classes for kids (as well as teens and adults) from our home for the past three months, when I heard "Super Mario" my mind immediately flew to delicious Italian foods.  

So I decided to marry the two ideas and make a Super Mario inspired kids apron and cooking set!

Fortunately a child's apron does not require much fabric at all. I was able to pull the red and blue fabrics from my stash along with big yellow buttons.  Two packages of black biased tape cost about $4 after my fabric store discount. 

First I quickly measured and sewed together the blue and red fabrics. Press your seam open.
I used a cotton broadcloth for this project which comes folded in half on the bolt. I used half of the unfolded width for the width of the apron. 

Blue and red fabrics sewn together and pressed
with seam open
Next I folded the fabric in half and, using chalk, drew on the apron top shape.   Then I cut the fabric along those lines.
Apron shape drawn on the fold.
 I also cut a piece of solid coloured fabric for the backing of the apron.   Cotton broadcloth is a lightweight fabric so I added the backing to both give the apron a bit more weight as well as neatly hide all the seams
Apron front and back cut
 With a bit of the blue fabric scraps I created the straps for Marios iconic overalls. I pressed raw edges under and ran a quick top stitch to keep everything in place.
Overall straps
 I pinned the straps to the apron front and then top stitch those in place.
Straps pinned down
 Next I added the big yellow buttons, and suddenly it was identifiable as Super Mario inspired.
Big yellow buttons on
 I chose black biased tape for this project as a nod to the cartoon nature of Super Mario.  Inside the fold of the tape was both the front and back layers of the apron.  One package of bias tape did the top and the bottom three straight edges.  Do not do the rounded edges yet.  Pin the tape in place with care and use a zig zag stitch to help be sure you are catching all fabric with every stitch.
Almost done!
 Next, open the second package of black bias tape and cut it into three equal pieces. Taking one of the thirds, find its midpoint. place that midpoint in the center of the raw curved edge and pin in place.  This will leave "tails" of bias tape at the top and bottom of the curved edges.  These will be the ties for around the neck and waist. Once you have pinned, zig zag stitch the entire length of your bias tape.

That Guy's cooking classes require that we have certain cooking related supplies on hand. Like chef hats and new wooden spoons and child sized rolling pins. I added a pizza cutter and a mixing bowl that I got at the dollar store for $2 each. Gift total now $8.

I also decided to really send home the Super Mario theme by carefully drawing the logo onto the chef hat with a red marker.  I think it's totally adorable, and the birthday boy loved it!
Taa-daa!